
I remember the first time I made this homemade vanilla bean cake for my family. The smell of vanilla filled our house. Everyone was excited to try it. This cake is now my favorite for any celebration.
It’s moist and rich, perfect for birthdays or holidays. The vanilla bean paste adds a deep, authentic flavor. It’s sure to impress anyone.
vanilla bean cake recipe
This cake is a classic, and I’ve made it better over time. It’s great with many frostings and decorations. In this article, I’ll show you how to make this amazing cake. You’ll learn about the ingredients and how to fix common baking problems.
Whether you’re new to baking or experienced, this recipe will be a hit. It’s easy to make and can be customized for any event.
Key Takeaways
- Moist and rich texture, perfect for any occasion
- Vanilla bean paste adds a bold and authentic vanilla flavor
- Easy to make and customize with various frostings and decorations
- Perfect for beginners and experienced bakers alike
- Can be made ahead of time and stored in an airtight container
- Ideal for birthdays, holidays, and special events
Table of Contents
The Magic of Vanilla Bean in Baking
Vanilla bean is a key ingredient in baking. It adds a unique flavor and aroma to many treats. Unlike vanilla extract, vanilla beans have a richer taste.
There are different types of vanilla beans out there. Madagascar beans are sweet and creamy, while Tahitian beans are fruity and floral. Knowing these differences helps bakers pick the right bean for their recipes.
Vanilla beans also improve the texture of baked goods. They make cakes and pastries velvety. Using vanilla extract or vanilla bean paste, choose high-quality to enhance your baked goods’ flavor.
| Type of Vanilla Bean | Flavor Profile |
|---|---|
| Madagascar | Creamy, sweet |
| Tahitian | Fruity, floral |
Essential Ingredients for Your Vanilla Bean Cake
To make a delicious vanilla bean cake, you need the right vanilla bean cake ingredients. The recipe calls for 3 cups of all-purpose flour, 2 ½ teaspoons of baking powder, and 1 teaspoon of baking soda. It also needs ½ teaspoon of coarse kosher salt, 2 sticks of unsalted butter, and 1 ½ cups of granulated sugar.
For the cake, you’ll also need 4 large eggs, ½ tablespoon of vanilla bean paste, and 1 cup of buttermilk. These essential ingredients for cake come together to make a moist and flavorful cake.
Here are the essential ingredients you’ll need:
- 3 cups of all-purpose flour
- 2 ½ teaspoons of baking powder
- 1 teaspoon of baking soda
- ½ teaspoon of coarse kosher salt
- 2 sticks of unsalted butter
- 1 ½ cups of granulated sugar
- 4 large eggs
- ½ tablespoon of vanilla bean paste
- 1 cup of buttermilk
It’s important to use room temperature ingredients for a light and fluffy cake. Measuring the ingredients accurately is also key for the right texture and flavor. With these vanilla bean cake ingredients and a bit of practice, you’ll make a delicious cake for any occasion.
By following the recipe and using the right essential ingredients for cake, you’ll impress your friends and family. Always choose high-quality ingredients, including real vanilla bean paste, for the best flavor and texture.
| Ingredient | Quantity |
|---|---|
| All-purpose flour | 3 cups |
| Baking powder | 2 ½ teaspoons |
| Baking soda | 1 teaspoon |
| Coarse kosher salt | ½ teaspoon |
| Unsalted butter | 2 sticks |
| Granulated sugar | 1 ½ cups |
| Large eggs | 4 |
| Vanilla bean paste | ½ tablespoon |
| Buttermilk | 1 cup |
Required Kitchen Tools and Equipment
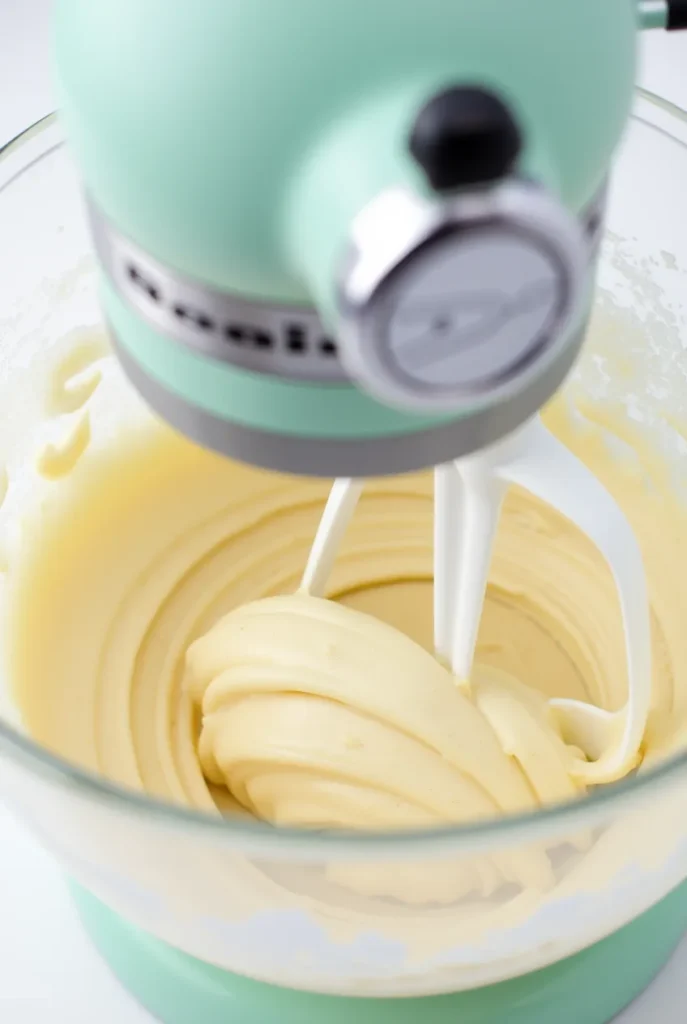
To make a successful vanilla bean cake, you need the right tools. Invest in a stand mixer and a paddle attachment for a smooth process. Use 3 x 8-inch round cake pans for the perfect layered cake.
Other tools like a whisk, rubber spatula, and measuring cup are also helpful. They make baking easier and more fun. With these tools, you’re ready to bake this delicious vanilla bean cake.
Basic Baking Tools
Here are the basic baking tools you’ll need:
- A stand mixer with a paddle attachment
- 3 x 8-inch round cake pans
- A whisk
- A rubber spatula
- A measuring cup
These tools are essential for baking many treats. They help you make cakes, cookies, breads, and pastries. With the right equipment, you can achieve professional results at home.
Cake Pan Selection Guide
Choosing the right cake pans is important. Consider the size and shape you want for your cake. For layered cakes, use 3 x 8-inch round pans.
Think about the material and any non-stick coatings too. These features can affect your baking experience.
Perfect Vanilla Bean Cake Recipe: Step-by-Step Instructions
To make the perfect vanilla bean cake, follow this vanilla bean cake recipe with step-by-step instructions. First, whisk together flour, baking powder, baking soda, and salt. Then, cream together butter and sugar. Next, add eggs, vanilla bean paste, and buttermilk.
The total time to prepare and bake the vanilla bean cake is 1 hour 10 minutes. This includes 15 minutes of prep, 35 minutes of cooking, and 20 minutes of cooling. The cake layers bake for 33-35 minutes at 350°F (175°C).
Here is a list of ingredients needed for the cake:
- 3 cups (375g) of all-purpose flour
- 3 cups (600g) of granulated sugar
- 2.5 teaspoons (10g) of baking powder
- 1 teaspoon (6g) of salt
- 1 cup (226g) of room temperature unsalted butter
- 7 egg whites or 1 cup from a carton (235g)
- 1 tablespoon (12g) of vanilla bean paste
Follow these step-by-step instructions to make the perfect vanilla bean cake recipe. Start by preheating the oven to 350°F (175°C). Then, whisk together the flour, baking powder, baking soda, and salt. In a separate bowl, cream together the butter and sugar. Add the eggs one at a time, followed by the vanilla bean paste and buttermilk. Pour the batter into the prepared pans and bake for 33-35 minutes.
| Ingredient | Quantity |
|---|---|
| All-purpose flour | 3 cups (375g) |
| Granulated sugar | 3 cups (600g) |
| Baking powder | 2.5 teaspoons (10g) |
| Salt | 1 teaspoon (6g) |
| Unsalted butter | 1 cup (226g) |

Mastering the Vanilla Bean Scraping Technique
To get the most flavor and aroma from vanilla beans, you need to master the scraping technique. This means splitting the bean and scraping out the seeds with a knife or spoon. It takes a bit of practice, but with patience, you’ll soon be able to extract the seeds for your baking.
Choosing high-quality beans is crucial for successful scraping. Most vanilla beans come from Madagascar. Recently, storms have damaged crops, making vanilla more expensive. Look for Grade A Tahitian vanilla beans. They are bigger and have more seeds than Grade B beans.
- Split the vanilla bean lengthwise to expose the seeds.
- Scrape out the seeds with a knife or spoon, taking care not to damage the bean.
- Use the scraped seeds immediately, or store them in an airtight container to preserve their flavor and aroma.
By following these tips and practicing the technique, you’ll unlock the full flavor of vanilla beans. This skill is key for making homemade vanilla extract or using vanilla beans in recipes.
| Vanilla Bean Type | Seed Count | Flavor Profile |
|---|---|---|
| Grade A Tahitian | High | Rich, creamy |
| Grade B | Lower | Milder |
Mixing and Baking Tips for a Moist Crumb
To get a moist crumb, it’s key to mix and bake right. Don’t overmix the batter, as it can make the cake dense. Instead, gently fold the ingredients until they just come together.
Remember to use room temperature ingredients like unsalted butter and large eggs. This helps the cake stay moist and tender. Also, mixing granulated sugar and vegetable or canola oil helps a lot.
Here are some extra tips for mixing:
- Use a kitchen scale to measure ingredients accurately
- Mix the butter and oil together for about 3 minutes until it’s pale yellow
- Add the granulated sugar slowly, beating for 3 minutes until it’s pale yellow and fluffy
- Add each egg one at a time, mixing for 3 minutes after all eggs and vanilla extract are in until bubbles form
For baking, use the right temperature and time. Bake at 350°F (about 175°C) for 22-30 minutes. Always check the cake to make sure it’s not overcooked.
By following these tips, you’ll make a delicious, moist crumb. Use top-quality ingredients like high-quality butter and whole eggs for the best results. With practice and patience, you’ll make a moist, tender cake for any event.
| Mixing Tips | Baking Tips |
|---|---|
| Use room temperature ingredients | Use the right temperature (350°F) |
| Mix the butter and oil together for 3 minutes | Bake for 22-30 minutes |
| Add the granulated sugar slowly | Check the cake regularly to avoid overcooking |
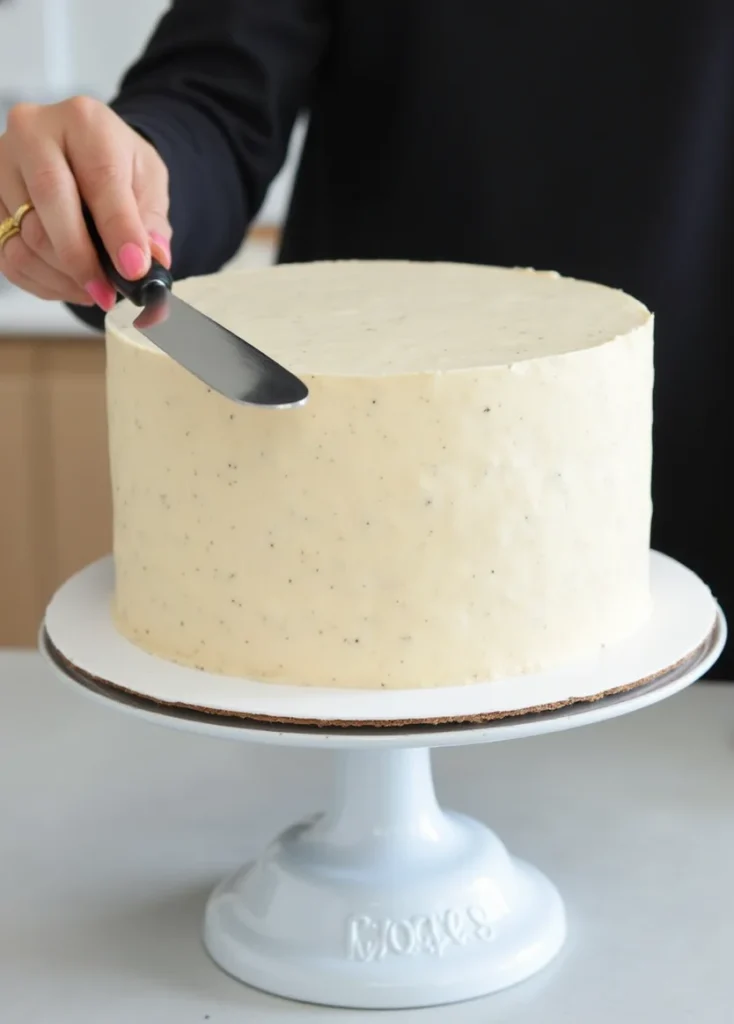
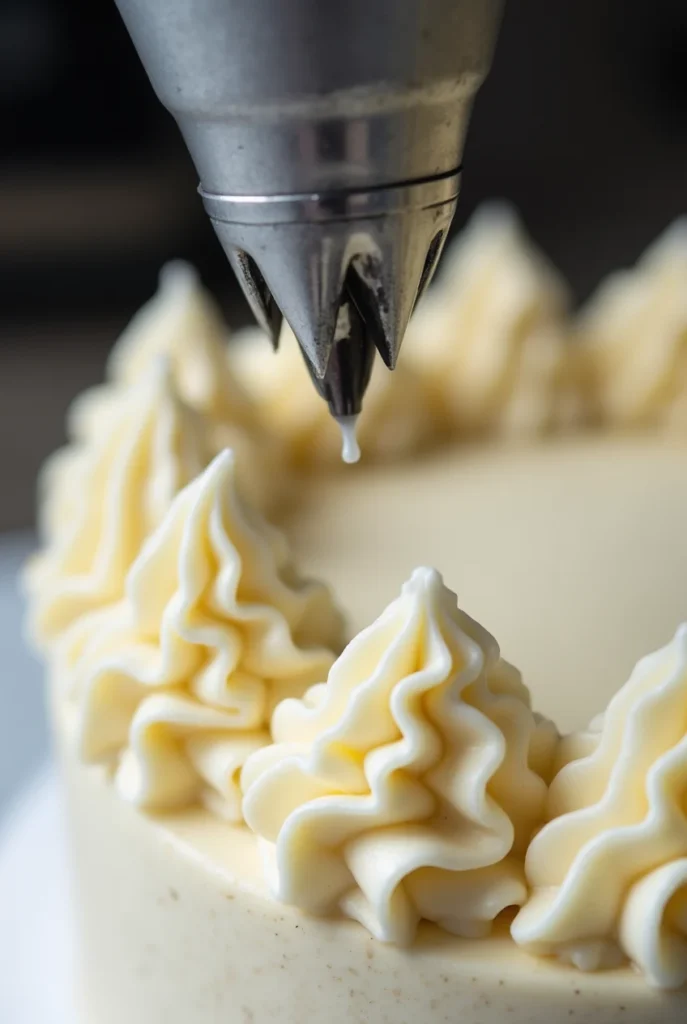
Creating the Perfect Vanilla Bean Frosting
Getting the right consistency and flavor in vanilla bean frosting is key. It’s the perfect topping for a moist cake. Use 1 ½ cups of unsalted butter, 4-6 cups of powdered sugar, and 1 tablespoon of vanilla bean paste for a classic buttercream.
Making the frosting is quick, taking about 5-10 minutes. You’ll get around 3 cups, enough for a two or three-layer cake. You can tweak the powdered sugar to taste and add a pinch of fine ground sea salt for sweetness balance.
Here are some tips for creating the perfect vanilla bean frosting:
- Use high-quality vanilla bean paste for the best flavor.
- Adjust the amount of powdered sugar to achieve the desired consistency.
- Add a pinch of fine ground sea salt to balance the sweetness.
Try a cream cheese alternative or a whipped cream frosting for a twist on traditional vanilla bean frosting. These options add a unique flavor to your cake.
| Frosting Type | Ingredients | Prep Time |
|---|---|---|
| Classic Buttercream | 1 ½ cups unsalted butter, 4-6 cups powdered sugar, 1 tablespoon vanilla bean paste | 5-10 minutes |
| Cream Cheese Alternative | 8 oz cream cheese, 2 sticks salted butter, 2 teaspoons pure vanilla extract | 10-15 minutes |
| Whipped Cream Frosting | 1 cup heavy whipping cream, 2 tablespoons unsalted butter, 1 teaspoon vanilla bean paste | 5-10 minutes |
Follow these tips and recipes to make the perfect vanilla bean frosting. Whether you choose classic buttercream or something unique, the right frosting enhances your cake’s flavor and look.
Troubleshooting Common Baking Issues
As a baker, I’ve faced many baking issues, like dry cakes and uneven textures. Understanding the causes and using troubleshooting techniques is key. Problems like dry cake, uneven texture, and cake sticking to the pan often stem from over-mixing, wrong flour measurement, or bad oven temperatures.
Some important stats to remember: over-mixing can make cakes up to 25% denser. Also, 60% of baking failures come from wrong flour measurement or mixing. Baking at too high temperatures can make cakes 40% drier. To fix these, measure ingredients carefully, mix right, and check oven temperatures.
Here are some common baking issues and their solutions:
- Dry cakes: check oven temperature, avoid over-baking, and ensure proper flour-moisture ratio
- Soggy bottoms: avoid excess liquid, use the right pan size, and rotate the cake halfway through baking
- Sinking cakes: avoid opening the oven door during baking, use the right leavening agents, and ensure proper baking time
By knowing the causes of these baking issues and using troubleshooting techniques, you can make perfect cakes every time. Always measure ingredients right, mix correctly, and check oven temperatures to avoid common baking issues.
Customization Options and Flavor Variations
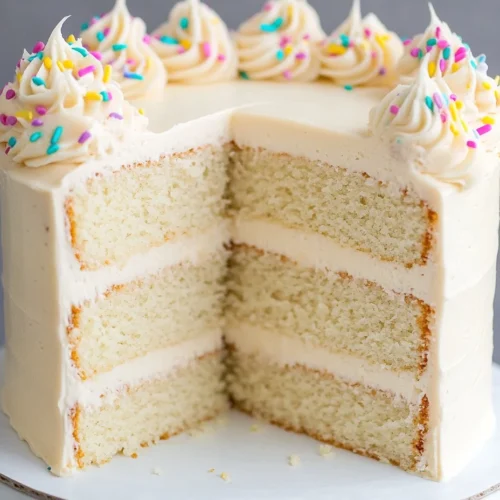
This vanilla bean cake recipe is super versatile. It lets you create a cake that’s just right for you. You can make it into a layer cake or cupcakes, and there are endless possibilities.
Flavor-wise, you can do a lot. Try adding cocoa powder for chocolate, or matcha powder for a green tea taste. A little cinnamon, cardamom, or allspice can also spice up your cake. Plus, adding cocoa nibs or chocolate chips can give it a nice texture and taste.
Layer Cake Modifications
To make a layer cake, just multiply the recipe and adjust the baking time. You can mix and match flavors by using different jams or glazes between the layers. Adding up to 3 types of jam can make it even more tasty. And tossing fruit or nuts in flour before adding them helps them stay on top.
Cupcake Adaptation
For cupcakes, just bake for about 19 minutes. You can also try new flavors like almond, coconut, or orange blossom extracts. These options let you make a cake that’s just what you like.
Here are more ideas for making your cake special:
- Try using almond or soy milk for a non-dairy version
- Add a bit of sea salt or salt to balance the sweetness
- Use brown sugar or turbinado sugar for a different taste
- Try whole wheat or gluten-free flour for a healthier option
With these ideas, you can make a cake that’s just right for you. Whether it’s a layer cake or cupcakes, you can impress anyone with your creativity.
Storage and Serving Recommendations
To keep your vanilla bean cake fresh and flavorful, proper storage is key. The environment and packaging play a big role. You can store the cake at room temperature for up to 3 days, in the fridge for up to 5 days, or freeze it for up to 3 months.
For the best taste and texture, let the cake come to room temperature before serving. If you need to store it, wrap it tightly in plastic wrap or aluminum foil. This helps prevent drying out.
Here are some detailed storage guidelines:
- Room temperature: Store the cake in an airtight container at room temperature for up to 3 days.
- Refrigeration: Wrap the cake tightly and store it in the refrigerator for up to 5 days.
- Freezing: Wrap the cake tightly and store it in the freezer for up to 3 months. When you’re ready to serve, thaw the cake at room temperature or reheat it in the microwave.
By following these tips, you can enjoy your vanilla bean cake for longer. It will stay fresh and flavorful.
Remember, proper storage and serving are crucial for your cake’s quality. With these tips, you’ll serve your vanilla bean cake with confidence, knowing it will taste its best.
| Storage Method | Duration |
|---|---|
| Room Temperature | Up to 3 days |
| Refrigeration | Up to 5 days |
| Freezing | Up to 3 months |
Making Your Vanilla Bean Cake Ahead of Time
Making your vanilla bean cake ahead of time can save a lot of time, which is great for busy days. You can prepare your cake in advance and keep it for later. The cake can stay fresh in an airtight container at room temperature for up to 3 days. Or, you can freeze it for up to 3 months.
To make ahead, just follow the recipe and let the cake cool completely before storing. This prevents moisture buildup and keeps the cake fresh. Freezing the cake layers separately and thawing them when needed is another good option. It’s ideal for make ahead preparations, making a delicious vanilla bean cake ready quickly.
Some benefits of making the cake ahead of time include:
- Reduced stress on the day of serving
- More time to focus on other aspects of the event or meal
- Ability to prepare and store the cake in advance, making it perfect for busy schedules
By following these simple tips and techniques, you can enjoy a delicious homemade vanilla bean cake, even on the busiest of days. And with the ability to make ahead and store, you can have a stress-free cake preparation experience.
Irresistible Homemade Vanilla Bean Cake Recipe
Equipment
- Stand mixer with paddle attachment
Ingredients
- 3 cups 375g all-purpose flour
- 2 ½ teaspoons 10g baking powder
- 1 teaspoon 6g baking soda
- ½ teaspoon coarse kosher salt
- 2 sticks 226g unsalted butter
- 1 ½ cups 300g granulated sugar
- 4 large eggs
- ½ tablespoon 12g vanilla bean paste
- 1 cup 240ml buttermilk
Instructions
- Preheat oven to 350°F (175°C). Grease and line three 8-inch cake pans.
- In a bowl, whisk together flour, baking powder, baking soda, and salt.
- In another bowl, cream butter and sugar until pale and fluffy.
- Add eggs one at a time, mixing well after each.
- Stir in vanilla bean paste.
- Alternate adding dry ingredients and buttermilk, starting and ending with dry.
- Divide batter evenly between pans and bake for 33-35 minutes.
- Cool cakes for 20 minutes before removing from pans.
Notes
- Use room temperature ingredients for a better texture.
- Don’t overmix the batter to keep the cake light and fluffy.
- Store at room temperature for 3 days, refrigerate for 5 days, or freeze for 3 months.
- Pair with vanilla bean frosting or whipped cream for the best taste.
Nutrition
Conclusion: Mastering Your Vanilla Bean Cake Journey
Baking the perfect vanilla bean cake is a journey that requires practice and patience. This article has given you a detailed recipe and guidance. I’m sure you’ll soon master the art of making homemade vanilla bean cake.
Every time you bake, you’ll learn more and understand the ingredients and techniques better. Don’t worry if it’s not perfect at first. The important thing is to keep trying and improving.
Enjoy the process of mastering the recipe. Whether it’s for a special event or just a treat, I hope this cake brings happiness to you and your family. Happy baking!
FAQ
What is the difference between real vanilla beans and vanilla extract?
Real vanilla beans offer the full flavor and aroma of the vanilla plant. Vanilla extract, on the other hand, is a processed and diluted version. Using real vanilla beans in baking gives a more intense and authentic taste.
What types of vanilla beans are best for baking?
Madagascar and Tahitian vanilla beans are the most popular for baking. Madagascar beans have a strong, classic vanilla taste. Tahitian beans are more floral and fruity.
What are the essential ingredients needed to make a vanilla bean cake?
To make a vanilla bean cake, you need flour, sugar, butter, eggs, vanilla bean paste, baking powder, and salt. High-quality vanilla bean paste is key for a bold flavor.
What basic baking tools are needed to make a vanilla bean cake?
You’ll need a mixing bowl, a hand mixer or stand mixer, a spatula, measuring cups and spoons, cake pans, and a wire cooling rack. Optional tools include a kitchen scale and a vanilla bean scraper.
How do I properly split and scrape a vanilla bean?
To split a vanilla bean, slice it lengthwise with a sharp knife. Then, scrape out the seeds and paste with the back of the knife or a small spoon. This releases the bean’s full flavor and aroma.
What are the best techniques for ensuring a moist and tender crumb in the vanilla bean cake?
Mix the batter gently and avoid overmixing. Use room temperature ingredients and bake at the right temperature and time. Proper cooling and storage help keep the cake moist.
What are some good frosting options to pair with a vanilla bean cake?
Classic buttercream, cream cheese frosting, and whipped cream frosting are great choices. Each frosting offers a unique flavor and texture that complements the cake.
How can I customize the vanilla bean cake recipe to make a layer cake or cupcakes?
To make a layer cake, divide the batter between pans and adjust baking time. For cupcakes, scoop batter into a muffin tin and bake for less time. The recipe can be scaled for different sizes and formats.
How should I store and serve the vanilla bean cake?
The cake can be stored at room temperature for up to 3 days, in the fridge for up to 1 week, or in the freezer for up to 3 months. Let it come to room temperature before slicing and enjoy with your favorite frosting.
Soooo good!
This salad is delicious. I left out spinach and onion, because I didn’t have any. It was delicious anyway.
I love feta cheese!
I LOVE IT
I absolutely love Panera Bread’s Chicken Salad! It’s the perfect blend of fresh ingredients and delicious flavors. The chicken is always tender and well-seasoned, and the combination of crisp celery, crunchy pecans, and sweet grapes creates a perfect balance of textures and tastes. The creamy dressing ties everything together beautifully without being too heavy.
Whether I have it on a sandwich, with a side salad, or just by itself, it never disappoints. It’s a great option for a light yet satisfying meal. I highly recommend it to anyone looking for a refreshing and tasty chicken salad.
Source Links
- https://www.sweetandsavorybyshinee.com/vanilla-cake/ – Best Vanilla Cake